Showing posts with label hand embroidery. Show all posts

January 2, 2017

Easy felt strawberries


Why not make some simple strawberries for decoration, or for kids to play with?


Step 1: Draw a circle on a red piece of felt (or other fabric), and cut into thirds.


Step 2: Embroider little strawberry seeds


Step 3: Sew up side up strawberries (by hand, or by machine), with right sides facing (inside).


Step 4: Turn the strawberry right-side out. Sew a gathering stitch along the top of the strawberry, and fill with some stuffing.


Step 5: Pull the gathering stitch tight and fasten at the top with a few more stitches. Then cut some leaves from some green felt.


Step 6: Fasten the leaves to the strawberry. Admire!

March 29, 2010

A gold monocle and a seedy moustache


Meet Sir Reginald Walter, the most eligible bachelor in the dotee world, created for The Bachelor Dotee swap on swap-bot. He has a seedy moustache and a gold monocle! His hankie coordinates with his stripey blue tie! He has a slick part in his full head of hair! He looks a bit like the Monopoly man! He is refined and wordly! And he brought flowers... I'm sure you can see why he drives all the dotee girls wild.


Unlike Dotee Dad USB, where I cut around the countour of the head, here I decided to have a background. I think it worked well. As an added bonus, I used up some cute scraps and a cute button I acquired from the local op-shop.

Once again, I felt compelled to have the back of the dotee mirror the front.

It took several hours to make, and I did the felt in layers. The final dimensions were: 4" tall, 2" tail, 2.5" hanger. Because of the small size, I didn't use real buttons, but instead worked the gold thread into french knots.


I sketched the dotee while having a coffee at my favourite local café. I set up a blank template & was happy enough with the first sketch to go with it. Sir Reginald Walter may have lost the walking stick, but he remained pretty true to the sketch!


Related posts:

November 7, 2009

Eugene wants a hug!

I finished Eugene last night, so he'll be off to join the everyone else's toys for the Softies for Mirabel drive soon :)

He turned out pretty well, though I had trouble with a few things. I struggled with the face stitching and ended up using small black felt circles for the eyes. I was incapable of sewing the horns on straight, and it took me ages to do the last step where you tuck in the bottom and sew on the legs... but it was worth it!


Related post: Udderly lovely cow for Mirabel

October 1, 2009

English paper piecing with the Brown Owls


Last Sunday I attended Canberra's September Brown Owls get together. The theme was open, so I brought along the English paper piecing kit from a previous meet-up. Even though I missed that get together, I saw what the others got up to and wanted to give it a go myself.

You can make the templates yourself, or buy them. If you're in Australia, Lizard of Oz specialises in English Paper piecing and appliqué.

If you're interested in giving it a go, or simply want an explanation about what it's about, Sunshine has a pretty comprehensive post on it. She also has an alternative design you can use.

The method I was kindly taught by a fellow Brown Owl was mildly different: when basting the fabric to the cardboard shape, we pinned down two opposing edges of the hexagon, then creased all the other sides of the fabric over the edge. When it came to the threading, we stuck a needle through a corner of the hexagon near one of the pins, then put it through the middle of the side, and up again through the next corner and do on and so forth until we got all the way around.

In the photo above, I'd already cut the basting stitches and removed the cardboard template from the central hexagon, to be able to reuse it. I used some leftover scraps from a reversible tote I recently made.

July 27, 2009

Felt monkey phone case

I bought a new phone recently - not because my trusty old brick of a Nokia finally died (that thing was indestructible), but because I had carelessly misplaced it. After three weeks of searching, I briefly toyed with the idea of forgoing a mobile phone altogether, before caving in and getting a new-fangled one. I also shelled out for a protective plastic case... which I promptly broke.

Hence the birth of Grégoire, my grumpy phone cover, inspired by Rosa Pomar's soft toy from the book Plush-O-Rama.


He's made of felt, with bamboo wadding to offer a little protection.... the phone slides neatly in and out of the mouth, much to the bemusement of those around me at the time!

January 19, 2009

Itty bitty dotee fever

In my last post, I mentioned that I was having to redo my doll for the Itty Bitty Dotee Swap on Swap-Bot due to fraying.

Well.... it's complete! Behold the complete wheat dotee! You'll notice that the hair changed completely from the original sketch - I still haven't worked out how to do yarn hair! I think the bullion ringlets are cute though, even though she now looks like she is called Helga and should be serving beers part of Oktoberfest! I managed to salvage the face off the first dotee, only redoing the french knots (one was loose)

The wheat is a little off-center, and the bottom a bit crooked - but it doesn't really matter!


Complete, Helga measures 4"... she has a 2" long torso (1 1/4" wide) and the hanger & tail measure about 1" each. I decided that that was not itty bitty enough! I'm sure my swap partner wouldn't mind, but I'm sending her an even ittier bittier one too anyway. It was so much fun to make!

I stuck with the nature theme again. Meet Lady Dotee Bug!


She's made entirely of felt (the ladybug is from a novelty printed felt square) and is truly tiny! She was much quicker to sew up, and I used blanket stitch around the edges. And she has french knot cheeks!

So just how much smaller is she?


She's about 2 1/4" tall in total. Her torso is just under 1 1/2" long (3/4" wide), her hanger is 1/2" long and her tail is just over 1/4" long.

Unless you count the pseudo-dotee pig, these are my first dotees! :)

So what's next? Not a dotee! For my next swap I have to make a flower-person ATC... we'll see how that goes!


January 18, 2009

Bullion Stitch & Itty bitty dotee

Whilst browsing dotees on flickr, I came across one that had cute little lips. The creator mentioned that she'd simply used french knots. Having never done any (I'd only dabbled in cross stitch before), I was happy to come across a video tutorial on the Needle'nThread website. It was more helpful than some of the diagrams I have seen, like this one in one of my books:


I began looking at more of Mary's video tutorials and stumbled across the bullion knot tutorial.

I immediately went and found some linen remnants I had stashed away from a dress I made, and a big hoop I used for cheap screen printing. The only embroidery thread I had was blue, so I kind of free-styled some different stitched: french knots, bullion stitches, fly stitch and a little satin stitch.


The results weren't exactly stellar, but more importantly it was fun!

Next, I went to Lincraft and bought a whole lot of different coloured DMC embroidery threads & a smaller hoop as it was quite awkward working on the large one. I used another patch of linen (note the different look of the fabric - it's the same linen, just the other side) and stitched a little bullion rose bud. It's not perfect, but it was fun and it rather cute (I used two fly stitches for the stem & leaves).

One of the reasons I'm mentioning these stitches, is that I'm participating in the Itty Bitty Dotee Swap on Swap-Bot and wanted to incorporate a little hand embroidery into it.

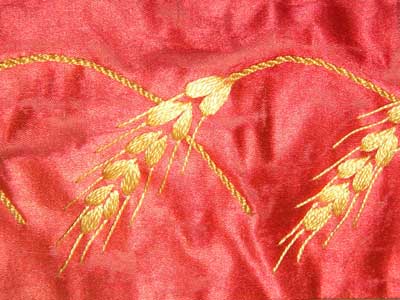
I was inspired by the beautiful insects and plants on Mary's Breath of Spring Embroidery Project. I initially wanted to embroider a butterfly, but I had beautiful shades of yellow thread and decided to start with something a little simpler. I liked the look of the wheat ears featured on an ecclesiastical piece in disrepair, which were done in satin stitch. I found a tutorial on Satin stitch, and jumped right into the project.

I stitched a single ear of wheat (after all the mini dotee is only about 2" tall!!) and was fairly happy with how it turned out. I practiced a little first, and decided to use a single strand of thread. I combined this with a strand of gold metallic thread for the long straight tips & the stem.

After cutting out the little face, I used backstitch to put on the closed eyes, and I tried out the bullion knot lips. While it's cute, I think they may be a little too big for such a small face!

Next, I cut out the shape of the doll so that I could get sew the face on in the right position. This is where I made a big mistake - I hadn't considered the dangers of fraying, which was quite an oversight! I've been doing a fair amount of felt crafting recently, and it didn't even cross my mind. Disaster struck when I began stitching the hair. I used a big needle, because I used several strands of yellow thread and one gold all at once. The fringe went OK, but making the bullion stitch ringlets put a lot of strain on the material, and it frayed awfully. You can see in the photo that there is only one ringlet on the right, and the fraying that has occurred above it.


Not to be disheartened, I packed my little embroidery basket with the correct threads and materials, and on the 3.5 hour bus ride up to Sydney on Friday, I stitched another one.

Overall, I think the ear came out better the second time round. I was more consistent with the "direction" of my stitches (although they are nothing like in the original), and the hairy tips were better spaced apart. Unfortunately my attempt at graciously curving the stalk simply made it look like I couldn't stitch straight!

I still have to finish her off, and I think I'll leave cutting out the fabric to the very end. Also, I'll sew the two pieces of material together using a reinforced stitch on my sewing machine because both pieces are prone to fraying. I'll post a picture when she's done!

I still have a long way to go with Satin stitch, but am glad to have opportunities to practice in small projects like dotees.
Related Posts Plugin for WordPress, Blogger...