Showing posts with label sent. Show all posts

December 8, 2016

Quilt for Pulse


I remember the sense of hopelessness I felt when hearing about the events unfolding in the Pulse nightclub in June 2016. It was a targeted attack on a gay nightclub on a "latin night".

Not long afterwards, I saw a call out by the Orlando Modern Quilt Guild for quilts. Any contribution was welcomed, from single blocks, through to quilt tops, and of course finished quilts. The recommended block pattern was a simple heart one from cluck cluck sew.

Initially planning on completing just some blocks, I soon found myself watching out for bright colours in quilt shops, quickly picking up some beautiful background fabric (Paradise by Chong-a Kwang for Timeless Treasures) from Shellys Sewing Centre in Goulburn and a jelly roll of Moda Grunge from HobbySew Belconnen. I had never worked with a Jelly roll before, and soon found myself designing quilt after quilt, trying to incorporate a rainbow design, and taking care of the quantity of fabric required. Finally, I settled on this design:


I had no real neutrals in my stash, so I got a couple of jelly rolls of Whispers by Muslin Mates for Kona, and some generic fabrics from Lincraft and Addicted to Fabric.

It was a real labour of love, requiring a lot of math, fabric layout choices, careful cutting, and never ending ironing. So many seams when working with jelly rolls!


Bit by bit, I saw my design come to life, and before long the top was finished.


Because I bought my backing before having a quilt design/final size in mind, I was short by a frustrating few inches. This required a little more design work, and some thin strips of neutral to form small hearts and tie into the front of the quilt

Next was the question of quilting. My old sewing machine has not a lot of throat space, and I was tossing up between straight-line quilting and a stipple effect. With a little help from Christina Cameli's book "First steps to free-motion quilting" and a sewing desk I received from my local Buy Nothing Group (allowing me to lower the working area of the machine to table level), I launched head first into my first serious free-motion quilting.


It was difficult working the stitches on such a small machine, but I love how it turned out.


Made with Love by Jen E. 2016 #quiltsforpulse
 
I was proud to send the quilt to Orlando, to take its place with well over a thousand other quilts worldwide. I have seen that the distribution of these quilts has begun.

You can check out many of the quilts made by searching for the tag #quiltsforpulse
Lastly, I wanted to mention that there was a lovely short news clip about the project, and another news clip on distributing quilts to the Orlando police department.

September 22, 2015

Dotee with a fancy button

It's been over 5 years since I last made a dotee doll, or participated in a swap on swap-bot.

I don't know what brought me back to them, but I really enjoyed taking part in the "Dotee with a fancy button" swap.


I had a lot of fun in the details, including the beaded/laced bodice and weaving metal through the hair.


I also recently discovered a site called So Sew Easy, where I got a pattern for a nappy changing mat for a baby shower. There's also an active Facebook group, where I saw lots of people posting about a "teeny tiny mini zipper pouch".

I decided to make a pouch for the dotee doll, and found that using some of my 7.5sq in Japanese charm pack fabric was the perfect size, and I added some of the same lace used on the dotee's bodice when top-stitching the zip.


I had a lot of fun designing this, and I was so happy to see that people are still making and swapping dotees. I'm looking forward to making more! Flickr has lots of great inspiration.


March 7, 2012

Softies for Mirabel 2010


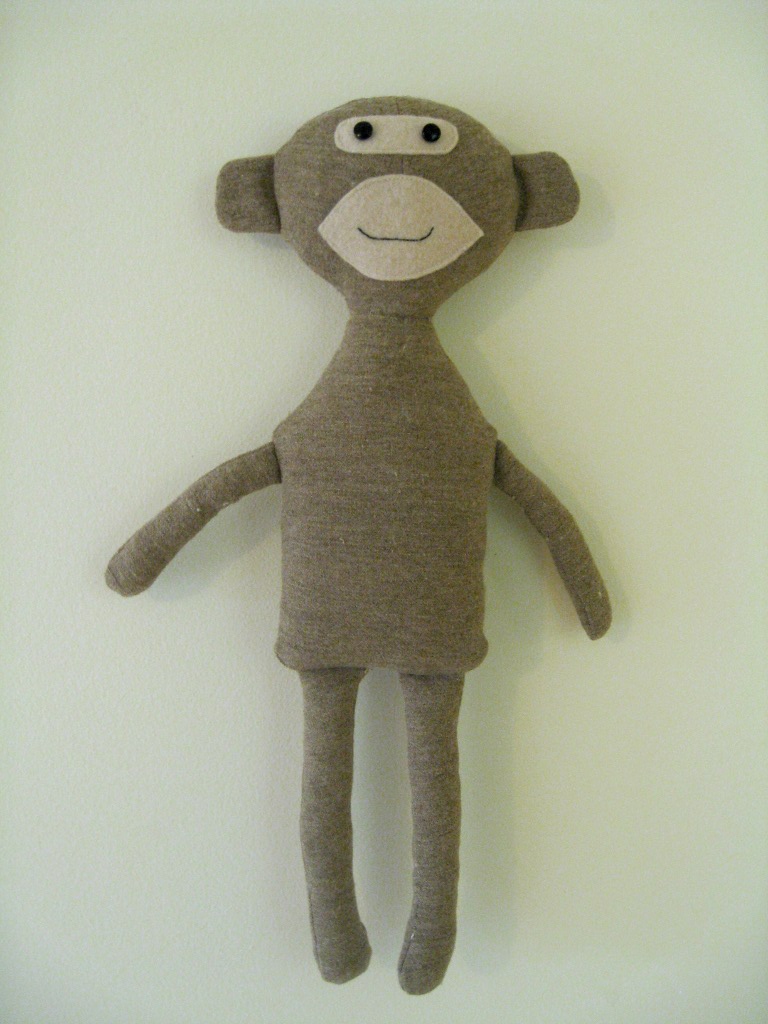
I got this this guy to Pip at Meet me at Mike's just in the squeak of time for the 2010 Softies for Mirabel drive.


It was the second time I'd joined in the fun, Eugene (the udderly lovely cow) having taken part in 2009.


George was made from the albert monkey pattern in the softies book, contributed by Fiona from Hop Skip Jump.

The trousers were very fiddly, but very cute.

It was a great project for using up odds and ends of fabric.

Sadly, I missed the deadline for the 2011 drive. I have the pieces already cut out for the 'Constance bunny' sketch, which might now end up as a Toy Society drop.

July 28, 2010

Bearded man ATC

My honours thesis is due in under three months, so expect a lot of procrastination crafting!

This afternoon, in between readings on survey-based experimental research via the web, I whipped up a Frankie Magazine ATC for a Send Something letter. Isn't the picture of the bearded guy awesome? It's made by the lovely lady over at the handmade romance blog.

I definitely need to carve a rubber stamp for the back of ATCs... could be a bit fiddly though!


Related post: Magazine collage ATCs

July 12, 2010

The envelope project

I'm a late comer to the Envelope project over at Meet me at Mike´s. I was motivated to join in the fun after seeing the envelopes that Anna Bartlett and Ingela Parrhenius sent in. The idea is that the decorated envelopes will be displayed in Pip's shop, and then one participant will be drawn at random and will receive the contents of all the envelopes. You can see the full set of photos over at flickr. If you want to join in, make sure your envelope arrives before the 2nd of August!

Here's a sneak peak of the contents of my envelope. On the left is a sweet gocco print of a bowerbird from Stellar Baby. On the right are two bookmarks - one is from a Colombian book shop (it says "reading is the key") and the other is from New Caledonia.


Related posts:

May 23, 2010

How now, brown... sheet!


I had an old brown sheet to cut up, but was struggling a bit to think of ways to make the bags pretty. It needed a stencilled design on it! Since my last foray into freezer paper stencilling, I have acquired more screen-painting ink colours! I now have black, white, blue, red and yellow.

White seemed perfect... and I was totally lazy and ended up using my laptop's screen as a lightbox, zooming in on the design and placing the freezer paper directly on the screen, tracing over the picture lightly.

Stencil: "Cypress Tree" by Lynell Harlow, available from www.stencilwithstyle.com/lgcatalog2.htm

Sometimes a Morsbag sets itself apart from the rest, and needs to be sent to someone rather than bundled off to the op-shop. This one made its way to Anna Bartlett, a blogfriend who wrote a lovely post about it.

The remaining brown bags had scraps of the blue/brown fabric attached to them.

Unfortunately, due to the length of the scraps & some interesting pinning, the result was less than picture-perfect. Adds to the charm, I'm sure... but next time I may place the stripe off-center, down one side!

May 3, 2010

Morsbag winner & discussion on plastic bags

I decided to be a little silly when it came to drawing the winner for the blue/brown Morsbag (pictured above). I felt like adding a human element!


First I chose three pink pencils and and labelled them 1-3.

Then, I randomised the entrants, thus associating each one with a pencil.


Last but not least, when my sister came around I asked her to pick a pencil (without explaining why). Then I got her to answer the same question I asked the contestants.

She picked #3, so congratulations darkpurplemoon! The parcel is on the way.

Thanks to all who entered! To finish off, I'd like to discuss the answers I received to the question
What is the single biggest obstacle to your living without plastic bags?
  • Lack of time! I confess I use disposable nappies (for my babies - it's not a weird sort of confession), and I dispose of them in plastic bags. But I always try to remember my ecobags for the shopping! (Anna Bartlett)
  • It is so hard to get things without plastic when you work full time. I am investigating getting things delivered from the local organic delivery service, but I grow a lot of my veg and I don't want to get things I already have. Our local farmers market is on a wednesday and friday. Er, yeah. Thanks for that! (darkpurplemoon)
  • I started sewing morsbags in October 2007 and since then I've drastically reduced the use of plastic bags. The main problem for me at the moment is how to dispose garbage. Depending on the garbage sometimes it might be difficult without a plastic bag... but I'm working on it! ;o) (I bag you)
  • I would miss being able to wrap dodgy containers with liquid - in case they spill/condense (My sister)

I agree with Anna & I bag you that garbage always seems to involve plastic bags... wrapping certain waste, lining bins... We always decline bags and we manage to cut down on the number of bags we use by trying to avoid excess packaging & composting vegetable scraps, but we line our bins nonetheless (our plastic bag stash will run out one day...), and some things just come packaged in certain sizes... as darkpurplemoon pointed out, farmers markets can be hard to get to on a busy schedule. I also agree with my sister. I bring my lunch in a cotton bag so condensation doesn't bother me, but spills do... I keep meaning to make some nice, plastic-lined, washable lunch bags!


Related post: 50 Morsbags = a giveaway!

April 1, 2010

Send some sparks of fun through the postal system!

Next time you send a letter, pause and consider the envelope.

If you haven't made the envelope yourself out of recycled pages, consider jazzing it up with a few scribbles or cut-outs... it makes receiving mail that much more fun! No doubt for the people delivering the mail as well...

These two envelopes were made for a penpal swap I hosted on swap-bot. The first was made with scrapbooking paper, and the second one is a drawn patchwork of vintage fabric.

I was inspired to start doing it more often after receiving a lovely map envelope from Communikate and many a hand-decorated envelope from bobberdilly (along with mail art & other drawings). If you have a moment, check out his blog - it is chocabloc full of amazing drawings.

In fact, this envelope was not just based on, it is pretty much a reproduction of one of the lovely pictures he sent me.

And this is an envelope I sent him... You can't tell from this scan, but the front of the envelope had just the face & the sea snail. And when you flip it over, you see that the face is attached to the body of a fish!

It's been fun, and I'm glad he's encouraged me to draw again (and not just copy other drawings & make collages). In turn, I encourage you all to decorate that next letter, or slip in a quick drawing you've done! Go forth and sending some sparks of fun through the postal system!

(Psst...If you're stuck on who to send to, or want to send out a drawing anonymously, don't forget about sendsomething.net)


Related posts:

March 29, 2010

A gold monocle and a seedy moustache


Meet Sir Reginald Walter, the most eligible bachelor in the dotee world, created for The Bachelor Dotee swap on swap-bot. He has a seedy moustache and a gold monocle! His hankie coordinates with his stripey blue tie! He has a slick part in his full head of hair! He looks a bit like the Monopoly man! He is refined and wordly! And he brought flowers... I'm sure you can see why he drives all the dotee girls wild.


Unlike Dotee Dad USB, where I cut around the countour of the head, here I decided to have a background. I think it worked well. As an added bonus, I used up some cute scraps and a cute button I acquired from the local op-shop.

Once again, I felt compelled to have the back of the dotee mirror the front.

It took several hours to make, and I did the felt in layers. The final dimensions were: 4" tall, 2" tail, 2.5" hanger. Because of the small size, I didn't use real buttons, but instead worked the gold thread into french knots.


I sketched the dotee while having a coffee at my favourite local café. I set up a blank template & was happy enough with the first sketch to go with it. Sir Reginald Walter may have lost the walking stick, but he remained pretty true to the sketch!


Related posts:

March 21, 2010

Dragonfly... or coconut tree?


After my unsuccessful attempt at traditional piecing for the the dancing dragonfly block, I gave paper piecing a go.


I used trusty Inkscape again, this time to lay out the pieces for each quarter block. The program allowed me to print a very precise paper-piecing template.


Sue Beever has great instructions on paper piecing in her Dancing Dragonfly Quilts book. I followed them, but noticed a few things things:
  • For pieces where the pattern wasn't symmetrical (so for the trapeze parts in the image above, and both "wing" sections), the mirror image of the piece was needed. So to get it to come right, I used the reverse side of the printed paper (where luckily I could still see the lines quite well).
  • Sue called for running paper through the sewing machine, and trimming it with a rotary cutter. I've been so good with not using my sharp tools with paper that I cringed a little as I did it. I should really keep a separate "paper needle" for the sewing machine, and get a spare blade for my Olfa rotary cutter... but I had a deadline and didn't want to take any chances, so I just gritted my teeth and went ahead with it.
  • The seam allowance of two joined bits of fabric both end up being on the same side. So you can't "iron the seams open" in the same way (except for the seams where I joined the four quarters of the block). Unfortunately I didn't take a picture of the back of the block... but you get the idea. I also found that it made the joined pieces sit together differently to the ironed-open seam pieces... One side is slightly raised compared to the other (the side where the seam allowance is tucked under...)

On the whole, I found this method to be very easy and accurate. I got a nice 12.5" square pumped out in a matter of hours (I was pretty pedantic, carefully ironing before adding each new piece and having to unpick a bunch of seams I wasn't happy with or that were a result of my placing the fabric the wrong way around). I can't imagine making enough blocks to make an entire quilt!

Anyway, I'm really happy with the way the block turned out, and how the colours make you hesitate... Is it a dragonfly... or a coconut tree?

I'm really looking forward to seeing what the other swap participants come up with, and of course the final quilt!


Related post: First attempt at a quilt block: dancing dragonfly

February 14, 2010

Happy Valentine's day to 15 strangers

The Morsbags crew coordinated a mass handout for Valentine's day. I decided to participate, seeing it as a good excuse to put a dent into the pile fabric I've been acquiring from the local op-shop. And I work so much better to deadlines!

I churned out a whopping 15 bags, which I posted into random letterboxes around my area late last night with a little note saying "Happy Valentine's day" & explaining what Morsbags are. Admittedly, the plan is flawed... who checks their mail on a Sunday?


Here are the bags, neatly stacked up on my desk... which is looking deceptively clean! Note my new pincushion from Ivory Blush Roses & lovely painting from DeadpanAlley... yay!

I spend a lot of time at this desk, with Uni work spread out everywhere one day, and then my trusty sewing machine out the next. As you can imagine, I spend a lot of time unpacking things and packing them back up. I look forward to the day when I might have a dedicated sliver of space for arty crafty activities!


So does my housemate, I'm sure, as from time to time our living room becomes an extension of my workshop. (Note the lovely retro red pincushion I bought from Ginpins...)

Most of the bags I made were from old pillow cases, but I made a few more from tea-towels.


I ended up making another bag from a horse tea towel, extending it with the same fabric I used for Eugene's body! The handles were sourced from a pillowcase.


The other tea-towel bag features Australian wattle and is "extended" at the top rather than the bottom. This one will actually be sent to someone overseas (via sendsomething) rather than put into a local letterbox.

I wish you all a lovely Sunday, whatever you have planned!


Related posts: Morsbags, Recycling old pillowcases into Morsbags, Morsbags from tea towels, Pin cushion from Ivory Blush Roses, Eugene wants a hug

February 11, 2010

Magazine Collage ATCs


Hot on the heels of my junk mail collages, I participated in a Magazine Collage ATC Swap over on swap-bot.

I spent a while poring over old Frankie Magazines to find inspiration, which wasn't hard because it's full of cute and quirky backgrounds, drawings, photos & articles :)

The process went something like this:
  1. Rip out magazine pages with interesting pics
  2. Carefully cut out around individual pics with an exacto knife & cut out various background prints
  3. Spend an hour or so rearranging all the little pieces around on a blank ATC until happy with the arangement
  4. Desperately try and glue all the pieces down whilst keeping them in place
  5. Look at all the bits and pieces which didn't make the cut... and repeat steps 3&4
As you can see in the pics above, I actually cut out an ATC-sized piece from the magazine's cover to use as the 'blank' canvas.


And we all know I'm a sucker for coordination, so the card & envelope also had to be made from Frankie magazine cut-outs!


January 21, 2010

Junk mail collages


I have not swapped on swap-bot for a little while now. But I did meet some great people through the site who I have projects on the side with.

One guy in particular, Robert Joy (Bobberdilly), sent me a fantastic letter with a decorated envelope and some drawings. We have been sending this "mail art" back and forth. It's a lovely, non-judgemental way of having a go at drawing.

He also mentioned that he and some friends are trying to make art out of junk mail. I don't know if it qualifies as art, but I thought I'd share my collages with you!

I'd love to see what other people come up with, so if you've had a go please leave me a comment with a link so that I can check it out.

November 7, 2009

Eugene wants a hug!

I finished Eugene last night, so he'll be off to join the everyone else's toys for the Softies for Mirabel drive soon :)

He turned out pretty well, though I had trouble with a few things. I struggled with the face stitching and ended up using small black felt circles for the eyes. I was incapable of sewing the horns on straight, and it took me ages to do the last step where you tuck in the bottom and sew on the legs... but it was worth it!


Related post: Udderly lovely cow for Mirabel

March 9, 2009

Matryoshka nesting dolls (squeebles!)


These are the nesting dolls I sent to my partner for the Matroyska Doll Swap! on swap-bot, along with the accompanying note:

Squeebles are born colourless and with no way to express themselves. Their bodies are pure white, and their eyes are black pools , incapable of expression. Their only other feature is their black hair. To compensate for this, they dress in the most colourful clothes they can, they favourite colour being anything fluoro. Also they have no mouth, they express affection by forming nesting groups. Families are usually found in this conformation, similar to Matryoshka dolls!


I made them from fluoro felt sheets (the colours don't show up too well, the green really is obscenely bright!) and some small plastic flower decorations sent to me by Dot with a purchase.

The pattern for them can be found at Maize Hutton's site.

Here is a close up of the smallest one, because I love miniature things!


And here are the Squeebles, innocently surveying the chaos that brought about their creation :)

Related Posts Plugin for WordPress, Blogger...